File Manager Tool
Documentation
Overview
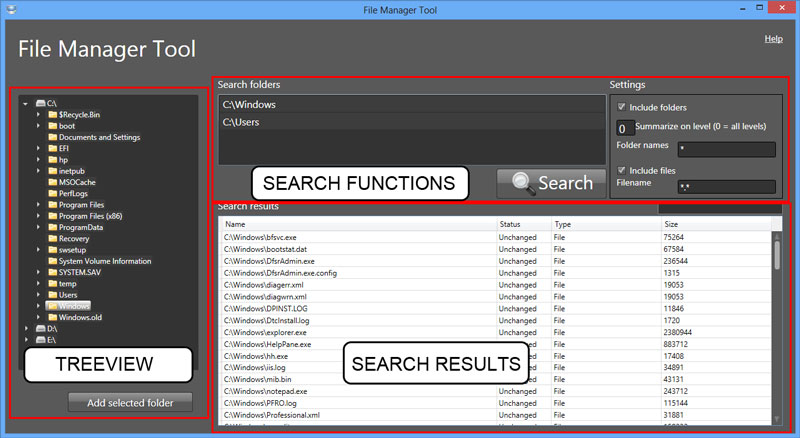
File Manager Tool has three main areas. First there is the folder treeview to the left, the search functions on the top right and below that is the results view.
Browsing files
Just like in Windows Explorer you navigate the hard drives folder structure by navigating the treeview to the left. Expand folders by clicking the small arrow next to the folder name. When you click a folder name it gets selected and the content of the folder is listed in the results panel.
Searching
In todays computer system, hard drive space is not an issue. With all that space, hard drives fills up with a lot of files. The main purpose of the File Manager Tool is to help you manage your files with a powerful and easy to use search function.
To start a search, navigate to the folder where you want to start your search and select by clicking on it. Now either right click on the folder and select Add to search or click the action button Add selected folder below the treeview to add the folder to the search. You repeat this and add more folders to be included in your search.
To remove a file from the search list, click the folder name to highlight it, then right click and select Remove from search from the context menu.
Settings
Before you hit the search button you should select what to search for and how it should be presented to you.
- Include folders
- Select wether to display folders in the search results or not.
- Summarize on level
- With this function you can choose to only return results to a certain folder depth from the starting folder. E.g if you want to see how much disk space each users home folders on a file server is using, add the folder that holds the home folders to the search window and search for all files and folders with Summarize on level set to 1.
- Folder names
- Set the pattern for folders to search for, using * as the wildcard character. This is separated from files search patterns to be able to filter files and folders separatly.
- Include files
- Select wether to display files in the search result or not
- Filename
- Set which files to search for, with * as the wildcard character.
- Date range
- Select to filter files on date changed. Select operator >,= or < and the date to search for. You can also search between two dates by selecting a second date in the date picker labeled "End".
Results
The results view contains four columns. First it displays the name of the file or folder. Since it is a search results, the full path is always shown, even when your just browsing the folder structure using the treeview. The second column is Status. The status can be Unchanged, Moved or Deleted. The status is displayed because the current search results remains even if you perform file operations like move or delete. When you perform a new search that status is always reset to Unchanged and moved files and folders are listed with their new location.
Ther third column is the type, showing if the object is a file or a folder. The last column is the size of the object. Remember when using the summarize function in the search settings, the size of the folder is the size of all underlying objects summed together.
File and folder operations
In the results view, you can perform som basic file and folder operations. If you double click a folder, it will be opened with ths standard Window Explorer. If you double click a file it will be opened with your standard program for the clicked file type. If no standard program is associated with the clicked file type, nothing happens.
You can move files be selecting files and folders in the search results, then right click in the search result area and select Move. Now the action button below the treeview changes to Move selected items. Select the destination folder in to treeview and then click the action button. To cancel the move, right click to search results view again and select Cancel move and the action button will retur to its default state.
Delete files or folder be selecting them and then right click the search results view, and select delete. Select multiple files and folders by holding down the Ctrl key while clicking.
File compression
To compress files from search results, select the files you wish to compress and right click on a selected item and choose Compress files from context menu to open the Compress files window.
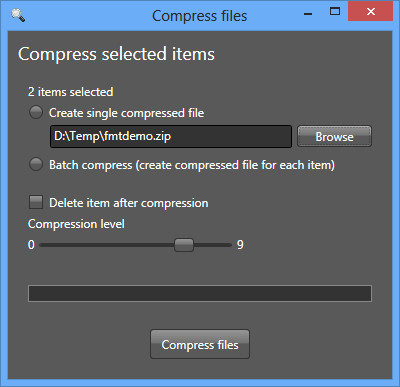
Create single compressed file
This option creates a single zip-file and adds all selected items to that zip file. Use the browse button to browse the destination folder and enter destination filename.
Batch compress
This option creates one zip-file for each selected item inte the search results.
Delete item after compression
Select this checkbox to delete the source file after it's added to the zip-file.
Compression level
Select compression level, the higher compression level, the smaller resulting zip-file but it takes longer to create i highly compressed zip-file.
To start compression process, click the Compress files-button.